Spring AI 框架下接入 agent skill 手把手教程
参考文档:Spring AI Agentic Patterns (Part 1): Agent Skills – Modular, Reusable Capabilities
引言
点进来的读者应该都了解了 agent skills 是什么,为什么会出现这种工程手段等等,此处不在多说,本篇博客聚焦于在 Spring-AI 下如何快速接入 Skills,并且探究背后实现的原理。
项目示例代码可以在 https://github.com/MimicHunterZ/PocketMind/tree/master/backend/src/main/java/com/doublez/pocketmindserver/demo 下查看,如果觉得项目不错,欢迎给我star~
环境准备
maven依赖
根据官方手册,skill 需要 Spring-AI 2.0.0-M2 版本以上,所以根据这个配置,项目demo的依赖如下:
<parent>
    <groupId>org.springframework.boot</groupId>
    <artifactId>spring-boot-starter-parent</artifactId>
    <version>4.0.2</version>
    <relativePath/>
</parent>
<properties>
    <java.version>21</java.version>
    <spring-ai.version>2.0.0-M2</spring-ai.version>
</properties>
<dependencies>
    <dependency>
	    <groupId>org.springframework.boot</groupId>
        <artifactId>spring-boot-starter-web</artifactId>
    </dependency>
    <dependency>
	    <groupId>org.springframework.ai</groupId>
	    <artifactId>spring-ai-starter-model-openai</artifactId>
	</dependency>
    <!--引入社区实现的 skills 工具-->
	<dependency>
	    <groupId>org.springaicommunity</groupId>
	    <artifactId>spring-ai-agent-utils</artifactId>
	    <version>0.4.2</version>
	</dependency>
</dependencies>
<dependencyManagement>
   <dependencyManagement>
    <dependencies>
	    <dependency>
		    <groupId>org.springframework.ai</groupId>
            <artifactId>spring-ai-bom</artifactId>
            <version>${spring-ai.version}</version>
            <type>pom</type>
            <scope>import</scope>
        </dependency>
    </dependencies>
</dependencyManagement>
<repositories>
    <repository>
	    <id>spring-milestones</id>
        <name>Spring Milestones</name>
        <url>https://repo.spring.io/milestone</url>
    </repository>
</repositories>
实测,Spring boot 3.5.10、jdk17、Spring AI 1.1.2 也可以跑通demo,不过不知道有没有更多的坑
yml配置
server:
  port: 8080
spring:
  application:
    name: pocketmind-server
  ai:
    chat:
      client:
        observations:
          log-prompt: true
          log-completion: true
    openai:
      api-key: xxxx # 替换为你的 API Key
      base-url: xxxx # 替换为你的 Base URL 不需要 /v1      chat:
        options:
          model: deepseek-chat # 替换为你使用的模型名称
示例demo采用 openai兼容的 api,如需兼容anthropic,那么根据对应文档进行切换即可
示例代码
skill.md
在根目录下添加对应的skill,skill的格式应该如下:
my-skill/
├── SKILL.md # Required: instructions + metadata
├── scripts/ # Optional: executable code
├── references/ # Optional: documentation
└── assets/ # Optional: templates, resources
在 skill.md 中 格式应该如下,至少应该包含元信息和详细的说明文档
---
name: code-reviewer
description: Reviews Java code for best practices, security issues, and Spring Framework conventions. Use when user asks to review, analyze, or audit code
---
# Code Reviewer
## Instructions
When reviewing code:
1. Check **for** security vulnerabilities (SQL injection, XSS, etc.)
2. Verify Spring Boot best practices (proper use of @Service, @Repository, etc.)
3. Look **for** potential null pointer exceptions
4. Suggest improvements **for** readability and maintainability
5. Provide specific line-by-line feedback with code examples
示例如下:

controller
import org.springaicommunity.agent.tools.FileSystemTools;
import org.springaicommunity.agent.tools.ShellTools;
import org.springaicommunity.agent.tools.SkillsTool;
import org.springframework.ai.chat.client.ChatClient;
import org.springframework.web.bind.annotation.*;
import java.util.Map;
@RestController
@RequestMapping("/demo")
public class SkillController {
    private final ChatClient chatClient;
    public SkillController(ChatClient.Builder chatClientBuilder) {
        this.chatClient = chatClientBuilder
                .defaultToolCallbacks(SkillsTool.builder()
                        .addSkillsDirectory(".claude/skills")
                        //也可以使用下面这个
//.addSkillsResource(resourceLoader.getResource("classpath:.claude/skills"))
                        .build())
                .defaultTools(FileSystemTools.builder().build())
                .defaultTools(ShellTools.builder().build())
                .defaultToolContext(Map.of("foo", "bar"))
                .build();
    }
    /**
     * 测试 skill 流程
     * @param message 用户的输入
     * @return
     */
    @PostMapping("/skill")
    public String chat(@RequestBody String message) {
        return chatClient.prompt()
                .user(message)
                .call()
                .content();
    }
}
此时运行程序,访问对应的端口即可查看返回内容
代码解释
- 先声明一个
ChatClient,并且通过DI进行注入 - 通过
chatClientBuilder进行builder策略构建-
.defaultToolCallbacks(...):给ChatClient一个“已经组装好”的工具包(包含代码逻辑 + JSON Schema 描述),此处即为注册 skill 功能 -
.defaultTools(): 注册对应的系统工具名称,用于动态发现skill来进行使用 -
.defaultToolContext(Map.of("foo", "bar"))添加工具上下文,防止报错 -
.defaultToolContext(Map.of("foo", "bar"))这个是为了框架报错,需要添加一个map传入作为ToolContext,否则无法正常build,为框架缺陷
-
- 通过链条进行构建llm的request
-
.user(message)加载用户提示词 -
.call()由框架内部发其请求 -
.content()获取大模型返回的内容
-
源码分析
0. 设置目录:
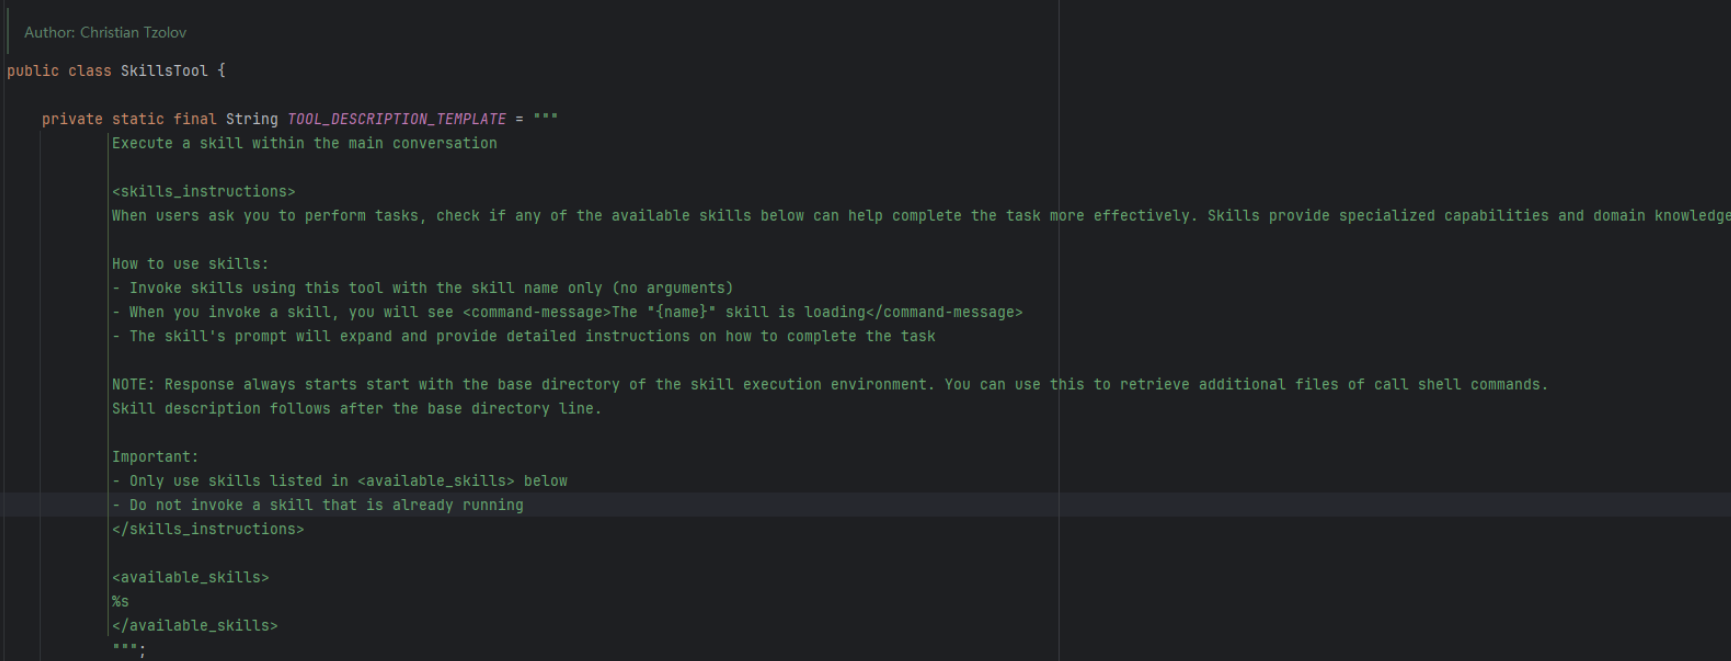
public class SkillsTool {
//...
	public static class Builder {
	    private List<Skill> skills = new ArrayList<>();
	    private String toolDescriptionTemplate = TOOL_DESCRIPTION_TEMPLATE;
	    protected Builder() {
	    }
	    public Builder toolDescriptionTemplate(String template) {
	       this.toolDescriptionTemplate = template;
	       return this;
	    }
	    public Builder addSkillsResources(List<Resource> skillsRootPaths) {
	       for (Resource skillsRootPath : skillsRootPaths) {
	          this.addSkillsResource(skillsRootPath);
	       }
	       return this;
	    }
	    public Builder addSkillsResource(Resource skillsRootPath) {
	       try {
	          String path = skillsRootPath.getFile().toPath().toAbsolutePath().toString();
	          this.addSkillsDirectory(path);
	       }
	       catch (IOException ex) {
	          throw new RuntimeException("Failed to load skills from directory: " + skillsRootPath, ex);
	       }
	       return this;
	    }
	    public Builder addSkillsDirectory(String skillsRootDirectory) {
	       this.addSkillsDirectories(List.of(skillsRootDirectory));
	       return this;
	    }
	    public Builder addSkillsDirectories(List<String> skillsRootDirectories) {
	       for (String skillsRootDirectory : skillsRootDirectories) {
	          try {
	             this.skills.addAll(skills(skillsRootDirectory));
	          }
	          catch (IOException ex) {
	             throw new RuntimeException("Failed to load skills from directory: " + skillsRootDirectory, ex);
	          }
	       }
	       return this;
	    }
	    //...
	}
//...
}
-
toolDescriptionTemplate: 添加 skill 描述说明

-
addSkillsResource、addSkillsDirectory添加 skill 的路径,支持多个
1. 加载 skill 元数据
这是加载器的入口。它会去你指定的文件夹里找
SKILL.md文件。
/**
 * Recursively finds all SKILL.md files in the given root directory and returns their * parsed contents. * @param rootDirectory the root directory to search for SKILL.md files
 * @return a list of SkillFile objects containing the path, front-matter, and content
 * of each SKILL.md file * @throws IOException if an I/O error occurs while reading the directory or files
 */
 private static List<Skill> skills(String rootDirectory) throws IOException {
    Path rootPath = Paths.get(rootDirectory);
    if (!Files.exists(rootPath)) {
       throw new IOException("Root directory does not exist: " + rootDirectory);
    }
    if (!Files.isDirectory(rootPath)) {
       throw new IOException("Path is not a directory: " + rootDirectory);
    }
    List<Skill> skillFiles = new ArrayList<>();
    try (Stream<Path> paths = Files.walk(rootPath)) {
       paths.filter(Files::isRegularFile)
          .filter(path -> path.getFileName().toString().equals("SKILL.md"))  // 遍历目录
          .forEach(path -> {
             try {
             // 解析文件:分为 FrontMatter (元数据) 和 Content (正文)
                String markdown = Files.readString(path, StandardCharsets.UTF_8);
                MarkdownParser parser = new MarkdownParser(markdown);
                skillFiles.add(new Skill(path, parser.getFrontMatter(), parser.getContent()));
             }
             catch (IOException e) {
                throw new RuntimeException("Failed to read SKILL.md file: " + path, e);
             }
          });
    }
    return skillFiles;
}
-
FrontMatter (YAML头):包含技能的名字(如
name: pdf)和描述。这部分会被提取出来,告诉 AI “我有这个技能”。 - Content (正文):这是具体的 Prompt 指令(比如“处理 PDF 的步骤是:1. 转换文本… 2. 提取摘要…”)。
- t添加 skill 技能
public ToolCallback build() {
    Assert.notEmpty(this.skills, "At least one skill must be configured");
    String skillsXml = this.skills.stream().map(s -> s.toXml()).collect(Collectors.joining("n"));
    return FunctionToolCallback.builder("Skill", new SkillsFunction(toSkillsMap(this.skills)))
       .description(this.toolDescriptionTemplate.formatted(skillsXml))
       .inputType(SkillsInput.class)
       .build();
}
- 此步骤会把扫描到的技能列表编织进工具的描述里。
- 当 AI 看到这个工具时,它的 Prompt 里会出现你定义过的 skill 列表,例如:
<skill><name>pdf</name><description>Extract text from PDF</description></skill><skill><name>git</name><description>Git version control</description></skill>
3. 调用skill
当 AI 决定调用
Skill("pdf")时,实际上触发了这段逻辑:
public static class SkillsFunction implements Function<SkillsInput, String> {
    private Map<String, Skill> skillsMap;
    public SkillsFunction(Map<String, Skill> skillsMap) {
       this.skillsMap = skillsMap;
    }
    @Override
    public String apply(SkillsInput input) {
       Skill skill = this.skillsMap.get(input.command());
       if (skill != null) {
          var skillBaseDirectory = skill.path().getParent().toString();
          return "Base directory for this skill: %snn%s".formatted(skillBaseDirectory, skill.content());
       }
       return "Skill not found: " + input.command();
    }
}
- 此时返回的是“路径”和“正文内容”,于是 AI 读到返回的文字后,会发现这是一份“Code Review 的操作指南”。
至此 skill 的机制已经完整实现了,ai 只需要根据返回的 Skill.md 就可以调用对应的说明或者reference/scripts 下面的技能。
如果读者对于spring ai 框架下 ai 怎么进行多次工具调用循环好奇,可以查看Spring ai下的工具调用以及循环调用。
© 版权声明
文章版权归作者所有,未经允许请勿转载。