Explain how the request flows through the selected code.
Step 4. 校验提示(Verification):用于快速验证 Codex 是否理解正确。
Summarize the request flow as a numbered list of steps. Then list the files involved.
CLI 工作流程(适合需要 Shell 命令与执行记录):
Step 1:在仓库根目录启动 Codex:
codex
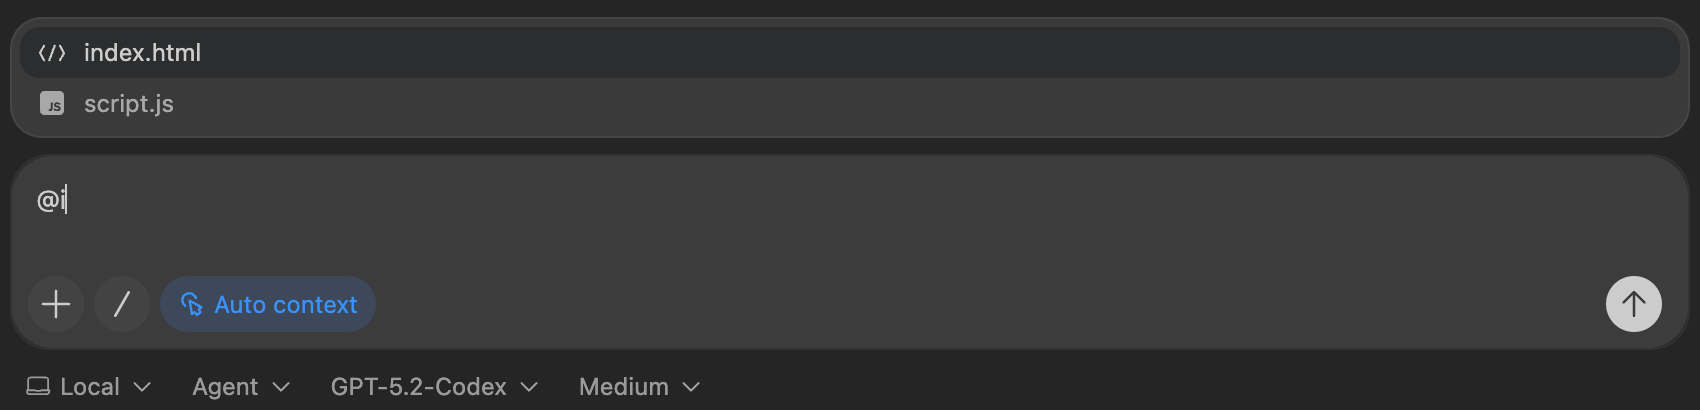
Step 2: 附加文件并提示:
I need to understand the protocol used by this service.
Read @foo.ts @schema.ts and explain the schema and request/response flow.
Focus on required vs optional fields and backward compatibility rules.
上下文说明:在 CLI 中使用 @ 或 /mention 附加文件路径
3.2 案例二:Bug 修复
当你本地可以重现失败行为时使用。
CLI 工作流程(快速复现 → 修复 → 验证)
Step 1. 启动 Codex
codex
Step 2. 提供清晰的 Bug 描述与复现步骤
问题描述: 点击设置页的 “Save” 有时显示 “Saved”,但实际上没有保存。
复现步骤:
1) npm run dev
2) 打开 /settings
3) 切换 “Enable alerts”
4) 点击 Save
5) 刷新页面,设置被重置
约束条件:
不修改 API 结构
修复尽量最小化
尽可能添加回归测试
Step 3. 校验
修复后再次执行复现步骤
运行 lint / 测试并汇报结果
IDE 扩展工作流程
Step 1: 打开你认为有问题的文件及其调用方 Step 2: 提示词
Find the bug causing "Saved" to show without persisting changes.
After proposing the fix, tell me how to verify it in the UI.
3.3 案例三:编写测试用例
当你希望明确指定测试目标和范围时使用。
IDE 扩展(基于选区)
Step 1. 打开函数所在文件
Step 2. 选中函数定义
Step 3. 通过命令面板选择 Add to Codex Thread
Step 4. 提示词
Write a unit test for this function.
Follow conventions used in other tests.
CLI 工作流程
Step 1. 启动 Codex
codex
Step 2. 提示词
Add a test for the invert_list function in @transform.ts.
Cover the happy path plus edge cases.
3.4 案例四:从截图原型生成代码
当你有设计稿或截图,希望快速生成可运行 UI 时使用。
CLI 工作流程(图片 + 提示)
Step 1:将截图保存为本地文件(如 ./specs/ui.png)
Step 2:启动 Codex
codex
Step 3: 将图片拖入终端作为提示的一部分
Step 4: 提示词
Create a new dashboard based on this image.
Constraints:
- Use react, vite, and tailwind in typescript.
- Match spacing, typography, and layout as closely as possible.
Deliverables:
- A new route/page that renders the UI
- Any small components needed
- README.md with instructions to run it locally
Step 5: 校验,如允许,让 Codex 启动 dev server 并给出访问地址
IDE 扩展(图片 + 项目风格)
Step 1:在 Codex 聊天中粘贴或拖入截图
Step 2:提示词
Create a new settings page.
Use the attached screenshot as the target UI.
Follow design and visual patterns from other files in this project.
3.5 案例五:迭代 UI
适合「改样式 → 刷新 → 再改」的快速循环。
CLI 工作流程
Step 1:启动 Codex
codex
Step 2:在另一个终端启动开发服务器
npm run dev
Step 3:提示词
Propose 2-3 styling improvements for the landing page.
Step 4: 选择方案并继续细化
Step 5: 在浏览器中实时预览并决定是否提交
3.6 案例六:将重构任务委派到云端
适合 本地设计方案,云端并行实现 的大任务。
本地规划(IDE)
Step 1: 确保代码已 commit 或 stash
Step 2: 让 Codex 生成计划:
$plan
We need to refactor the auth subsystem to:
- split responsibilities
- reduce circular imports
- improve testability
Constraints:
- No user-visible behavior changes
- Keep public APIs stable
- Include a step-by-step migration plan
Step 3: 审查并调整计划
云端执行(IDE → Cloud)
Step 1: 选择云环境
Step 2: 提示:
Implement Milestone 1 from the plan.
Step 3:审查云端 diff
Step 4: 直接创建 PR 或拉取到本地测试
3.7 案例七:本地代码审查
在提交或创建 PR 前进行质量检查。
CLI 工作流程
Step 1: 启动 Codex
codex
Step 2 :执行
/review
Step 3:可选增强提示
/review Focus on edge cases and security issues
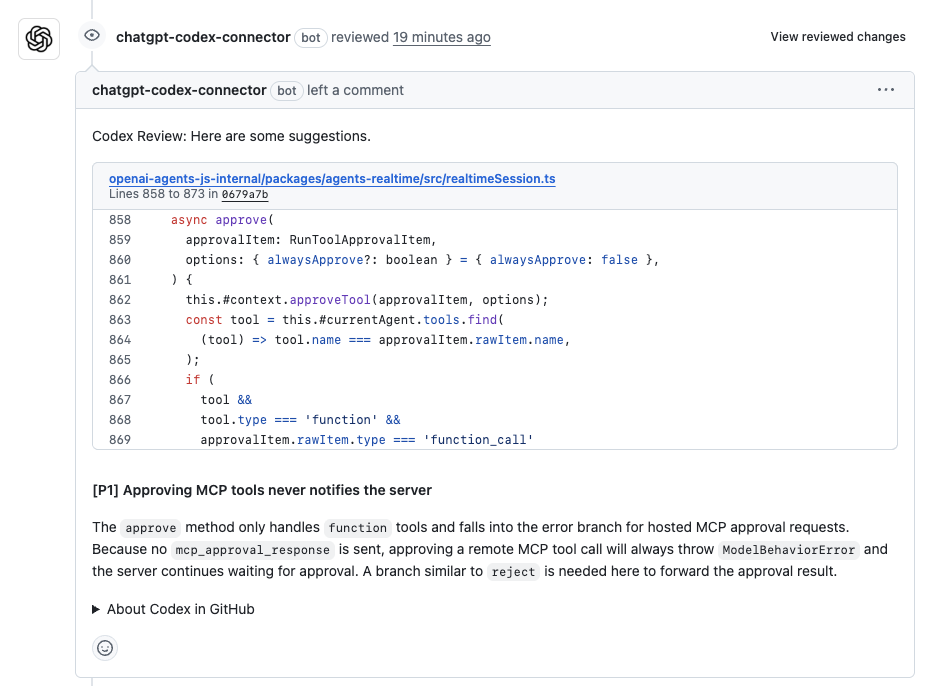
3.8 案例八:审查 PR
无需拉取分支即可获得审查意见。
GitHub 评论工作流程
Step 1: 打开 PR
Step 2: 评论
@codex review
Step 3: 或指定方向
@codex review for security vulnerabilities
3.9 案例九:更新文档
用于生成准确、一致的文档修改。
IDE / CLI 工作流程
Step 1:打开或 @ 引用目标文档
Step 2: 提示
Update the "advanced features" documentation to provide authentication troubleshooting guidance.
Verify that all links are valid.
Step 3: 审查并渲染确认
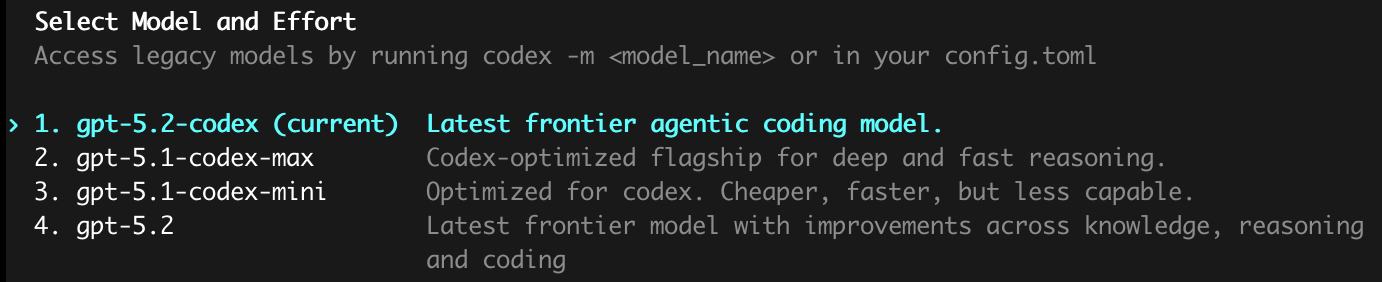
4. Codex 模型(Codex Models)
原文地址:https://developers.openai.com/codex/models
4.1 推荐模型
推荐:gpt-5.2-codex
面向真实工程任务的 最先进的智能编码模型,适用于 Codex CLI & SDK、IDE 扩展、云端任务、ChatGPT 积分和 API 调用